


| ||||||||


mtricot.narod.ru
Το πλέξιμο της κάλτσας

 ΛΑΣΤΙΧΟ
Ρίχνουμε τον επιθυμητό αριθμό πόντων, τους μοιράζουμε στις 4 βοηθητικές βελόνες και κλείνουμε σε κύκλο.
Πλέκουμε λάστιχο 1 καλή 1 ανάποδη στο ύψος που θέλουμε.
Τελειώνουμε με μια ολόκληρη σειρά, δηλαδή από τους πόντους της βελόνας 1 μέχρι τους πόντους της βελόνας 4 (βλέπε φωτογραφία). Η κλωστή από το ρίξιμο των πόντων μας βοηθά να προσδιορίσουμε αρχή και τέλος σειράς.

ΦΤΕΡΝΑ
Συνεχίζουμε με την φτέρνα στους μισούς πόντους του λάστιχου και μάλιστα τους πόντους που είναι στη βελόνα 1 & 4. Πλέκουμε ζέρσεϋ καλή, εκτός από τους 3 πρώτους και 3 τελευταίους που τους πλέκουμε ζέρσεϋ ανάποδη. Ξεκινάμε να πλέκουμε τους πόντους της βελόνας 1, γυρνάμε το πλεκτό και πλέκουμε τελειώνοντας τη σειρά με τους πόντους της βελόνας 4.
Στο ύψος πλέκουμε τόσες σειρές όσοι και οι πόντοι που έχουμε.

 Μοιράζουμε τους πόντους της φτέρνας στα 3.Πλέκουμε πρώτο και το δεύτερο τρίτο μέχρι τον τελευταίο πόντο. Αυτόν τον πόντο τον πλέκουμε μαζί με τον πρώτο πόντο του τελευταίου τρίτου (βλέπε φωτογραφία). Γυρνάμε το πλεκτό, φέρνουμε τον πρώτο πόντο στην δεξιά βελόνα χωρίς να τον πλέξουμε και πλέκουμε ανάποδη μέχρι τον τελευταίο πόντο του μεσαίου τρίτου. Αυτόν τον πόντο τον πλέκουμε μαζί (ανάποδη) με τον πρώτο πόντο του πρώτου τρίτου. Ξαναγυρνάμε το πλεκτό και φέρνουμε τον πρώτο πόντο στη δεξιά βελόνα χωρίς να τον πλέξουμε. Συνεχίζουμε την ίδια διαδικασία, πάντα πλέκοντας τον τελευταίο και πρώτο πόντο του μεσαίου τρίτου με τον πρώτο του εξωτερικού τρίτου, μέχρι να τελειώσουν οι πόντοι των εξωτερικών τρίτων.
Χωρίζουμε τους πόντους που έχουν μείνει στα δυο και τους μοιράζουμε πάλι στις βελόνες 1 & 4. Παίρνουμε καινούργιο νήμα, πλέκουμε τους πόντους της πρώτης βελόνας (φωτογραφία 1) και συκώνουμε πόντους από την ούγια της φτέρνας (φωτογραφία 2) και για να μην έχει τρύπα στη γωνία με το λάστιχο, ρίχνουμε άλλον 1π ενδιάμεσα (φωτογραφία 3) και μετά συνεχίζουμε να πλέκουμε τους πόντους που αφήσαμε στις βελόνες 2 & 3. Φτάνοντας στον τελευταίο π της 3ης βελόνας προσθέτουμε πάλι 1π στο λάστιχο για να μην γίνει τρύπα και συνεχίζουμε συκώνοντας πόντους από την άλλη ούγια της φτέρνας. Έτσι κλέινουμε πάλι το πλεκτό και συνεχίζουμε πάλι να πλέκουμε μόνο καλή.
 Αρχικά πλέκουμε 2 σειρές με όλους τους π. Μετά αρχίζουμε πάλι να μειώνουμε τους π της βελόνας 1 και 4, πλένοτας μαζί τον 2η & 3η π από το τέλος της πρώτης βελόνας και τον 2ο & τρίτο π από την 4η βελόνα (δεξί κλείσιμο = φέρνουμε τον π στη δεξιά βελόνα, πλέκουμε τον επόμενο και μετά γλυστράμε πάλι πίσω τον πρώτο π πάνω από την πόντο στην αριστερή βελόνα). Επαναλαμβάνουμε κάθε δεύτερη σειρά μέχρι να μείνουν σε αριθμό οι π της φτέρνας.

Πλέκπουμε μέχρι το ύψος του μικρού δάχτυλου της πατούσας και αρχίζουμε τα κοψίματα για την μύτη της κάλτσας αρχικά κάθε δεύτερη σειρά και μετά κάθε σειρά. Για να γίνει αυτό,κάθε φορά πλέκουμε μαζί 2ο & 3ο π από το τέλος της βελόνας 1 & 3 και τον 2ο & 3ο π της βελονας 2 & 4 (δεξι κλείσιμο). Όταν μελινου στις βελόνες μόνο 8π, τους μοιράζουμε στις 2 βελονες αντικρυστά (βλέπε φωτογραφία). Περνάμε την κλωστή από την ανάποδη και στερεώνουμε.
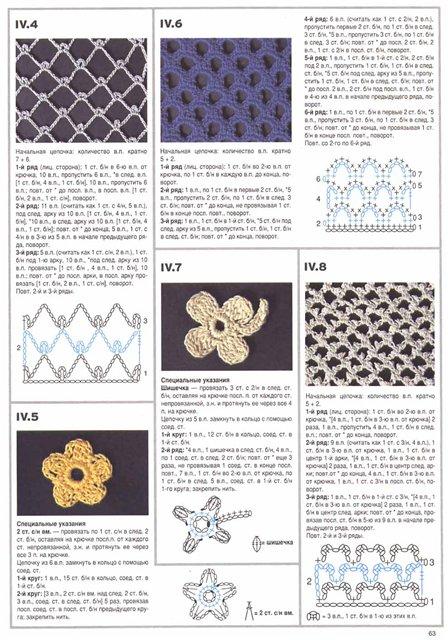
creationsbyeve.blogspot.comΠιάστε το βελονάκι σας και δοκιμάστε αυτά τα σχέδια:


 creationsbyeve.blogspot.com


creationsbyeve.blogspot.com


Διακοσμήστε τις πετσέτες σας με πλεκτές δαντέλες

Σχέδιο δαντέλας 1:

Σχέδιο δαντέλας 2:

Σχέδιο δαντέλας 3:

Σχέδιο δαντέλας 4:

Σχέδιο δαντέλας 5:

Σχέδιο δαντέλας 6:

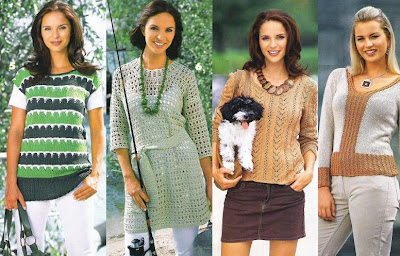
Αν όμως έχετε χρόνο και όρεξη να φτιάξετε ένα crochet φόρεμα ή φούστα για το καλοκαίρι,μπορείτε να βρείτε πολύ ωραία σχέδια online όπως αυτά από το knitting daily:

Ή δοκιμάστε αυτή τη φούστα που είναι πολύ εύκολη:


Πως να φτιάξετε εύκολα μια μπουτονιέρα με μεταξωτή μουσελίνα:
.JPG)
.JPG)
.JPG)
2). Περάστε κλωστή σε μια βελόνα και ερχίστε να τρυπώνετε την κάτω άκρη κάθε κομματιού το ένα μετά το άλλο:
.JPG)
3).Σουρώστε το ύφασμα σφίγγοντας και στερεώνοντας την κλωστή:
.JPG)
.JPG)
5).Κόψτε ένα δίσκο από τσόχα και ράψτε επάνω μια καρφίτσα, ή κόψτε με ψαλιδάκι συο μικρές εγκοπές πάνω στο δίσκο κει περάστε από μέσα την καρφίτσα χωρίς να την ράψετε:
.JPG)
.JPG)
Αυτή την καρφίτσα την έφτιαξα για τον διαγωνισμό της ευρωπαϊκής ομάδας που είναι "ο αγαπημένος σας ταξιδιωτικός προορισμός" αυτή την εβδομάδα και το θέμα το διάλεξε η Zsazsazsu.Στο blog της μπορείτε να δείτε όλες τις υπέροχες δημιουργίες που έγιναν γι΄αυτή την πρόκληση! Λατρεύω τα ταξίδια και όλος ο πλανήτης είναι για μένα αγαπημένος προορισμός, επέλεξα όμως το Παρίσι, που είναι μια πόλη που έχω ήδη επισκεφτεί τρεις φορές στο παρελθόν, αλλά δεν θα το βαρεθώ όσες φορές και αν πάω!
 creationsbyeve.blogspot.com/
To create a slip knot:
 | Step 1: Create a loop with your yarn, making sure that the tail of the yarn is dangling behind your loop. |
 | Step 2: Insert the hook through the loop, moving under the tail and back out the loop. |
 | Step 3: Grab tail and pull to create slip knot on hook. |
Base Adjustable Ring
An alternative method of creating a base ring for working in the round, unlike methods of chaining then joining the chain and working the fist round into the chain ring, this method allows you to pull the ring tightly closed after working the first round so that there is no hole whatsoever at the center of the work. Work the adjustable ring using the following steps:
 | Step 1: Make a large loop with your yarn, leaving a 4" tail trailing from your loop. |
 | Step 2: With the hook, draw working yarn through the loop |
 | Step 3: Ch 1. You have now initiated the adjustable ring. |
 | Step 4: Follow the pattern instructions to determine how many stitches to work in the ring. |
 | Step 5: Once the first round of stitches is complete, pull the tail snugly to close the ring and create a perfect first round. |
If you are chaining to start a project, it is necessary to begin the work by creating a slip knot on the hook. Do not count this slip knot in your chain count. Once your slip knot is created, or if you are instructed to chain within your pattern at some point other than the beginning of the instructions, use the following steps to chain:
 | Step 1: "Yarn Over" by bringing your working yarn around the hook from the back, around to the front and into the hook. "Yarn Over" is a common crochet term and is commonly abbreviated as "yo". TIP: Although the hook in this picture is shown somewhat downwards, it is always easier to yarn over when the hook opening is directly facing you. |
 | Step 2: Engage the yarn that has been passed into the hook by turning the hook downward and pulling through the loop that is on the hook. TIP: Tension is a crucial for easy crocheting. 2 key tips to acheive good tension and allow your hook to move smoothly:
|
 | Step 3: Pull this loop entirely though the loop that was previously on the hook. This completes the chain. |
 | Step 4: Chain as many times as the pattern directs. If working a "Base Chain" which will form the foundation of your project, you will later be directed to work crochet stitches into this chain. |
The photos below show an example of a half double crochet stitch being worked into a row of double crochet stitches..
 | Step 1: Yarn over hook (wrap yarn from back to front around the hook) once just below hook opening. |
 | Step 2: Keeping working yarn behind work, insert hook into the stitch indicated by the instruction. Yarn over to create a loop on the hook (wrap yarn around hook from back to front into hook opening). |
 | Step 3: Pull loop on hook through so that there are now 3 loops on the hook. TIP: If working in a chain, it is helpful to keep tension on the chain with thumb and forefinger of your hand opposite the hook so that the hook slides through easily. |
 | Step 4: Bring yarn over hook again, from back to front so that yarn engages in hook opening. |
 | Step 5: Draw loop through all of the loops on the hook. This completes the half double crochet stitch. TIP: Twist hook so that hook opening faces downwards when drawing through the loops on the hook. |
The photos below show an example of a double crochet stitch being worked into a base chain.
 | Step 1: Yarn over hook (wrap yarn from back to front around the hook) just below hook opening. |
 | Step 2: Keeping working yarn behind work, insert hook into the spot indicated by the instruction. Yarn over to create a loop on the hook (wrap yarn around hook from back to front into hook opening). |
 | Step 3: Pull loop on hook through so that there are now 3 loops on the hook. TIP: If working in a chain, it is helpful to keep tension on the chain with thumb and forefinger of your hand opposite the hook so that the hook slides through easily. |
 | Step 4: Bring yarn over hook again, from back to front so that yarn engages in hook opening. |
 | Step 5: Draw loop through two of the loops on the hook so that two loops remain on the hook. TIP: Twist hook so that hook opening faces downwards when drawing through the two loops on the hook. |
 | Step 6: Yarn over again. |
 | Step 7: Draw loop through remaining two loops on the hook so that only one loop remains on the hook. This completes a double crochet stitch. |
The photos below show an example of a treble crochet stitch being worked into a base chain.
 | Step 1: Yarn over hook (wrap yarn from back to front around the hook) twice just below hook opening. |
 | Step 2: Keeping working yarn behind work, insert hook into the stitch indicated by the instruction. Yarn over to create a loop on the hook (wrap yarn around hook from back to front into hook opening). |
 | Step 3: Pull loop on hook through so that there are now 4 loops on the hook. TIP: If working in a chain, it is helpful to keep tension on the chain with thumb and forefinger of your hand opposite the hook so that the hook slides through easily. |
 | Step 4: Bring yarn over hook again, from back to front so that yarn engages in hook opening. |
 | Step 5: Draw loop through two of the loops on the hook so that 3 loops remain on the hook. TIP: Twist hook so that hook opening faces downwards when drawing through the two loops on the hook. |
 | Step 6: Yarn over again. |
 | Step 7: Draw loop through two of the loops on the hook so that 2 loops remain on the hook. Yarn over again. |
 | Step 8: Draw loop through remaining two loops on the hook so that only one loop remains on the hook. This completes a treble crochet stitch. |
The photos below show an example of a double treble crochet stitch being worked into a base chain.
 | Step 1: Yarn over hook (wrap yarn from back to front around the hook) three times just below hook opening. |
 | Step 2: Keeping working yarn behind work, insert hook into the stitch indicated by the instruction. Yarn over to create a loop on the hook (wrap yarn around hook from back to front into hook opening). Pull loop on hook through so that there are now 5 loops on the hook. TIP: If working in a chain, it is helpful to keep tension on the chain with thumb and forefinger of your hand opposite the hook so that the hook slides through easily. |
 | Step 3: Bring yarn over hook again, from back to front so that yarn engages in hook opening. |
 | Step 4: Draw loop through two of the loops on the hook so that 4 loops remain on the hook and yarn over again. TIP: Twist hook so that hook opening faces downwards when drawing through the two loops on the hook. |
 | Step 5: Draw loop through two of the loops on the hook so that 3 loops remain on the hook. Yarn over again. |
 | Step 6: Draw loop through two of the loops on the hook so that 2 loops remain on the hook. Yarn over again. |
 | Step 7: Draw loop through the remaining 2 loops on the hook. The double treble stitch is now complete. |
 | The upper row of stitches in this photo illustrates completed double treble stitches.. |
The photos below show an example of slip stitch (in black yarn) being worked over a row of double crochet (in orange).
 | Step 1: Keeping working yarn behind work, insert hook into the stitch indicated by the instruction. Yarn over to create a loop on the hook (wrap yarn around hook from back to front into hook opening). |
 | Step 2: Pull loop on hook through both the stitch indicated by instruction and the loop on the hook so that only one loop remains on the hook. Thus completes the slip stitch. |
 | Pictured is a row of slip stitch (black) on a row of double crochet. |
The bullion stitch is beautiful and decorative AND tricky! It is accomplished by performing lots and lots of yarn overs before drawing through the yarn to complete the stitch- the tricky part is getting your hook to glide smoothly through all of those yarn overs.
The photos below show an example of the bullion stitch being worked onto a row of double crochet stitches..
 | Step 1: Yarn over as many times as the pattern directs, typically 7 to 10 times. |
 | Step 2: Insert hook into indicated stitch and yarn over. |
 | Step 3: Draw the yarn through all the loops on the hook! This completes the bullion stitch. Here are a few tips to make this go smoothly:
|
Clusters are 2 or more crochet stitches that have been joined at the top into a single stitch. A cluster can be worked out of any combination or number of stitches. The defining characteristic of a cluster is that the very last loop of a stitch is left unworked on the hook temporarily until all stitches in the cluster have been also partially worked to the last loop. The final step of a cluster is a yarn over and the yarn is pulled through all of the loops on the hook to create a single stitch.
Clusters are used for decreasing as well as to create a decorative effect in the fabric.
The photos below show an example of a cluster comprised of 3 dc's worked over 3 consecutive stitches.
 | Step 1: Partially work a double crochet stitch up until the point just before the "yarn over / pull through". |
 | Step 2: Yarn over, insert the hook into the next stitch and create another partially-worked double crochet stitch similar to the first stitch created. |
 | Step 3: Yarn over, insert the hook into the next stitch and create a final partially-worked double crochet stitch similar to the first two partial stitches. |
 | Step 4: Yarn over and draw the yarn through all the loops on the hook This completes the cluster of 3 double crochet stitches. |
The puff stitch creates a soft dimensional puff in your fabric. Think of it as a cluster of hdc stitches worked in the same stitch.
The photos below show an example of the puff stitch being worked onto a row of double crochet stitches..
 | Step 1: Yarn over hook (wrap yarn from back to front around the hook) once just below hook opening. |
 | Step 2: Insert hook into indicated stitch, yarn over and pull through a loop. You should have 3 loops on your hook. |
 | Step 3: Yarn over again in preparation to insert the hook into the very same stitch once again. (4 loops on hook) |
 | Step 4: Insert the hook into the same stitch, yarn over and pull through a loop. You should have 5 loops on your hook. |
 | Step 5: Yarn over again in preparation to insert the hook into the very same stitch once again. (6 loops on hook) |
 | Step 6: Insert the hook into the same stitch, yarn over and pull through a loop. You should have 7 loops on your hook. |
 | Step 7: Yarn over again and draw the yarn through all the loops on the hook. This completes the puff stitch. You can work an extra chain to secure the stitch. |
 | The diagram shows puff stitches with double crochet stitches on either side. |
The photos below show an example of the reverse single crochet stitch being worked into a row of double crochet stitches..
 | Step 1: Prepare to do reverse single crochet after completing a right side row. Once the right side row is complete, do not turn. |
 | Step 2: With hook facing downwards, insert hook into the first stitch to the right. Engage the working end of the yarn through the hook on the other side of the fabric. |
 | Step 3: Pull the loop through the stitch so that there are now 2 loops on the hook. The movement of pulling the yarn through so that the hook faces left will twist the loops on the hook. Yarn over. |
 | Step 4: Pull the yarn through the 2 loops on the hook as you would to sc. This completes a reverse single crochet stitch. |
 | Step 5: Twist the hook around to insert into the next stitch to the right and rsc again. The twisting movement of working backwards causes the loops on the hook to twist, resulting in the decorative effect of the stitch. |
 | Pictured is a row of reverse single crochet worked on a row of double crochet. |
When working over rows from the side of the work, or working over diagonal stitches, it is sometimes called for to work around the post of a crochet stitch.
In the example below, a double crochet stitch (in black) is worked over the post of another double crochet stitch (in orange).
 | This example will show how a double crochet stitch can be worked over the side of other crochet stitches. The photo shows the orange fabric to be worked. |
 | Insert the hook under the post of the double crochet stitch and pull up a loop to begin the double crochet stitch. |
 | Photo shows a completed double crochet stitch around the post of another double crochet stitch. |
The photos below show an example of a double crochet stitch being worked into a chain space.
 | The photo shows an example of a chain space within crochet work. |
 | To create a stitch within a chain space, insert the hook within the space, and create the appropriate stitch. |
 | Photo shows a completed stitch within the chain space. |
Working in between the posts of stitches when working a crochet fabric creates a more open fabric then working in the top of stitches.
You can crochet between the posts of any crochet stitch. The photos below demonstrate crocheting between the posts of double crochet stitches using double crochet stitches.
 | Anatomy of a Crochet Stitch: Pictured to the left is a crochet fabric made of 2 rows of double crochet stitches. Following are some definitions of the parts of a crochet stitch:
|
 | Standard Crochet Location Here's a look at the standard location for inserting the hook to make a crochet stitch. Not that it is below the front and back loops, yet above the lower horizontal thread. |
 | Working Between Stitches To work between crochet stitches, the hook is inserted underneath all of the horizontal threads of the stitch and between the posts. |
 | See the Difference? In the crochet fabric pictured to the left, the top row is worked between the posts of the stitches of the row below. In the middle row, the double crochet stitches are worked in the standard way at the top of the stitch. |
Working the front or back loops only of a stitch will leave a horizontal bar exposed on the fabric. The fabric will tend to be more elastic than when working under both loops, and it is possible to create interesting textural effects when working under a single loop only.
You can crochet in the front or back loop only of any crochet stitch. The photos below demonstrate crocheting in the front and back loop of double crochet stitches using double crochet stitches.
| Anatomy of a Crochet Stitch: Pictured to the left is a crochet fabric made of 2 rows of double crochet stitches. Following are some definitions of the parts of a crochet stitch:
|
 | Standard Crochet Location Here's a look at the standard location for inserting the hook to make a crochet stitch. Note that it is below the front and back loops. |
 | Working the Back Loop To work in the back loop of a stitch, insert your hook underneath the back loop only and make the stitch as indicated. |
 | Working the Front Loop To work in the front loop of a stitch, insert your hook underneath the front loop only and make the stitch as indicated. |
 | A Completed Fabric Shown at left is a fabric with the top row worked under either the front or the back loop. Notice that the stitches worked in the front loops will leave a horizontal bar on the side of the work opposite you, and stitches worked in the back loops leave a horizontal bar visible underneath the stitch on the side of the work facing you. |
Crocheting around the posts of crochet stitches is a way to add texture to your crochet fabric. There are 2 ways to crochet around the crochet stitch: from the front to the back and from the back to the front.
Crocheting around the posts of stitches is the way ribbing is worked in crochet fabric. To work ribbing, just alternate working one stitch from front to back and the next from back to front.
You can crochet around the posts of any crochet stitch, although the longer the stitch the easier it will be to crochet around the stitch post. The photos below demonstrate crocheting around the posts of double crochet stitches using double crochet stitches.
| Anatomy of a Crochet Stitch: Pictured to the left is a crochet fabric made of 2 rows of double crochet stitches. Following are some definitions of the parts of a crochet stitch:
|
 | Crochet around the Post from Front to Back Step 1: When starting the stitch, insert the hook from front to back and back to the front around the post of the indicated crochet stitch. Work between stitches under all horizontal threads of the stitch. |
 | Crochet around the Post from Front to Back Step 2: Complete the stitch (double crochet pictured). The completed stitch will be raised in front of the rest of the work. |
 | Crochet around the Post from Back to Front Step 1: To crochet from back to front, insert the hook from the back of the fabric around the front of the post of the stitch and to the back of the fabric again. Work in between the stitches underneath all the horizontal threads of the stitch. Complete the stitch as usual. |
 | Pictured to left are both types of stitches around the post of a stitch. When working from back to front around a post, the stitch stays below the surface of the rest of the work. When working from front to back, the stitch is raised above the surface of the work. |
Changing colors at the beginning of a row or round actually requires you to change the color at the last stitch of the previous row or round.
The photos below demonstrate color changes using double crochet stitches. The example also illustrates changing colors between rows, but the very same principles apply to changing colors between rounds.
 | Step 1: When changing colors at the beginning of a row or round, you will actually need to change yarns with the last yarn over / draw through of the last stitch of the previous row or round. Pictured here is a yarn over with the new yarn. TIP: When changing yarns, always leave about 4" of tail to weave in later. You can either lightly tie the tails into a knot, or just let them hang. When weaving in the ends during finishing, untie the knot (if made) before weaving in. |
 | Step 2: The new yarn is drawn through the loops on the hook and the previous row is complete. |
 | Multi-Color Fabric Pictured at left is a row of black double crochet stitches worked upon a row of orange double crochet stitches. |
The photos below demonstrate stitch skipping using double crochet stitches.
 | Step 1: Work the instructions up until the point of the stitch that needs to be skipped. |
 | Step 2: Skip the stitch and proceed working pattern instructions. |
The techniques shown below can be extrapolated so that more than 2 stitches can be worked together. (sc3tog, etc...)
The photos below show 2 stitches worked together. The same principles that are illustrated below can be used to stitch 3, 4 or even more stitches together, however the more stitches that are worked together, the more attention that needs to be paid to avoid puckering the fabric.
Single Crochet 2 Stitches Together (sc2tog):
 | Step 1: Begin the single crochet stitch as usual - Insert hook into the first stitch, yarn over and draw through a loop. |
 | Step 2: Instead of completing the stitch, insert the hook into the next stitch, yarn over then draw through a loop (3 loops on hook). |
 | Step 3: Yarn over and draw yarn through all 3 loops on the hook. Two stitches have now become one. |
 | Step 1: Begin the half double crochet stitch as usual; Yarn over hook (wrap yarn from back to front around the hook) once just below hook opening. |
 | Step 2: Instead of closing the stitch, insert the hook into the next stitch, yarn over and pull a loop through. (5 loops on hook) |
 | Step 3: Yarn over and pull yarn through all loops on hook. Two hdc stitches have now become one. |
 | NOTE: Although you can decrease using the technique we illustrate in clusters for dc2tog and taller stitches, an alternative method of decreasing is shown below for dc2tog where instead of joining the stitches at the top, they are joined at the bottom. Step 1: Begin the double crochet stitch as usual; Yarn over hook (wrap yarn from back to front around the hook) once just below hook opening. |
 | Step 2: Instead of closing the stitch, insert the hook into the next stitch, yarn over and pull a loop through. (5 loops on hook) |
 | Step 3: Yarn over and pull yarn through the first four loops so that 2 loops remain on the hook. |
 | Step 4: Yarn over and pull yarn through the the remaining loops on hook. Two double crochet stitches have now become one. |
When you have completed your project you will need to tie off your work after cutting your working yarn.
To tie off your crochet work:
 | Step 1: Cut your yarn, leaving a tail of at least 4" or the length that your instructions specify. |
 | Step 2: With tail, yarn over hook (bring tail from back to front over hook, engaging in hook opening). |
 | Step 3: Bring tail all the way through loop on hook and remove hook (pictured). At this point you can pull tail to tighten loop and secure the work. |
There are several options for incorporating beads into crochet fabrics. One option is to pre-string the yarn or wire and incorporate a bead within a single crochet stitch. The technique illustrated below is always worked on the wrong side of the fabric.
Need a hand with the basic crochet stitches? View our free, in-depth crochet tutorial.
To work the Backward Loop Cast-on:
 | Prestringing Beads: When you pre-string your wire or yarn with beads, you string them in the reverse order that you will actually use them. This means that those you stitch with last will be those that you load onto the wire first. |
 | Step 1: Prior to starting the stitch, scoot the bead up to the crochet hook. |
 | Step 2: Insert hook into next stitch and pull up a loop. |
 | Step 4: Complete the single crochet stitch as usual by yarning over and pulling through the last loop. |
 | Pictured are 2 more beaded single crochet stitches completed. Note that when working in this way, you are working on the wrong side of the fabric. |
 | View from the right side of the work. |

Yarn Over: Figure 16a
Knit 1 in the Front and Back Loops (k1f&b)/Bar Increase
This is one of the most visible increases in stockinette stitch -- it leaves a little bump that looks like a purl stitch. Use it decoratively, or use it when the purl bump is part of a stitch pattern. The bar increase is one of the easiest to make and is usually a favorite with knitters.
Knit 1 in the Front and Back Loops: Figure 16b

Knit 1 in the Front and Back Loops: Figure 16c
Make One (m1)
These increases are made simply by knitting into the horizontal strand between stitches on the right and left needles. One method creates a left-leaning increase, meaning that the front strand of the increase slants to the left. The other method leans to the right. This is called paired increases.To make a left-leaning increase:
Step 1: Insert the left needle from front to back under the strand (fig. 16d).

Left-leaning Increase: Figure 16d

Left-leaning Increase: Figure 16e

Left-leaning Increase: Figure 16f
Step 1: Insert the left needle from back to front under the strand (fig. 16g).

Right-leaning Increase: Figure 16g

Right-leaning Increase: Figure 16h

Right-leaning Increase: Figure 16i
tlc.howstuffworks.com/
Mitten Thumb Pattern Decoded!

I have mittens!!
These are the Super Mittens from the book Weekend Knitting . These mittens are knit with Paton's Rumor yarn in Duberry Heather (code name for "pink") and I needed one and a half skeins of yarn to complete two mittens. I used size 10.5 double-pointed needles and then at the very end of the mitten, when decreasing, I switched to smaller size 9 double-pointed needles. Same when decreasing the thumb. It made a nice smooth decrease.
These mittens probably took me about three or more hours for each one, but I am a slow knitter. Also, when making the gusset and starting the thumb stitches be sure you are in a place you can sit still and do it all at one time with no interruptions.
It's not super comfortable to cast on and knit that first row in the round but it gets easier as you have more fabric on the needles. If you can stand the awkwardness for a few rows it does get better! Ah, there are so many things in life that get better after some initial awkwardness....
Let's get to the thumb!


Super Mittens from the book Weekend Knitting
Even if you aren't making mittens from that specific pattern, hopefully this little explanation will help with thumbing. (Thumbing is totally legal in knitting!) So, when you get to making the thumb here is what you will have:

A mitten body and a hole where the thumb should go and a bunch of stitches on a stitch holder. Since I made this pattern in the next-to-largest size, I have 11 thumb stitches sitting on a stitch holder.
But the truth is, this method works no matter how many stitches your pattern uses. You're going to have some amount of stitches set aside to make a thumb. Those stitches will either be on a stitch holder or knit onto some scrap yarn, and you have this gaping hole. You need to find a way to connect all the stitches, make a few stitches to cover up the hole and knit in the round. That is your mission, should you choose to accept it!
Step one: Carefully slide half your stitches onto a double-pointed needle, then slide the other half onto another DPN. (See, I can use abbreviations, too!)
Since I have an uneven number of stitches, I put six stitches on one needle and five on the other.

Step two: Now you have the stitches on needles but there's no way to knit them unless you have some yarn! Adding yarn like this isn't really that hard. Just take the tail end of your yarn and drop it down into the hole that's about to become a thumb. I pulled enough yarn down inside the mitten so I could hold it pretty firmly in my left hand as I knit my first stitch. If you're worried about your first stitch being loose, you can always come back on the next round and tighten it up good. You will not go to mitten jail if your stitches aren't perfect!

Step three: Now start knitting. I have my mitten body on the right and my mitten thumb stitches on the left like so:

With a third double-pointed needle, insert the tip of the new needle into the first stitch between the mitten body and the thumb and begin knitting.
Just knit it right up! Knit all the stitches (I had 11 stitches to knit up.)

But see how I still have this big hole where the thumb joins the mitten:

Step four: Pick up stitches
This is the goofy fun part -- you're going to make stitches where none exist!! They call this "picking up stitches" or sometimes it's called "pick up and knit." I consulted my knitting guru, Stitch 'N Bitch: The Knitter's Handbook, for a full explanation. The author says that pick up stitches and pick up and knit both mean the same thing. But of course in knitting, as in life, ask four people and they'll all be experts with four different answers.
So all I can tell you is that for this thumb, you just make some loops where none existed and then on the next round you knit them as normal ol' stitches.
To begin, put a needle under a stitch on that open edge, wrapping yarn around the tip of the needle and drawing it through to make a loop on the needle (which you will then knit next time around). There is a great photo illustration at knitty.com and a video of this technique at KnittingHelp.com. And if the pictures and my yammering and the video still aren't enough, just try it yourself. I always learn best by doing it myself, anyway.
Ok, back to the pattern. It calls for three stitches to be picked up in this whole long area:

But I picked up five stitches. If I only made three stitches for this wide of an area there would be holes and my mittens are not meant to be holy! I will be picking up 5 stitches and then on the next round I'll do a fancypants "knit two stitches together" stealth move ... twice. That will decrease me back to the required number of stitches so I don't have a fat thumb on my mitten.
That means: My pattern wants me to have 14 stitches to knit in the round for my thumb to be a good size. I have 11 stitches on the stitch holder (and now on my double-pointed needles).
I have to pick up three stitches in the gap area, 11 + 3 = 14 total stitches.
But three stitches isn't enough to cover a whole big long gap! So I am picking up five stitches. 11 + 5 = too many! So I will fix it on the next round by decreasing two times. All is well in mittenworld.
So to pick up stitches, take an empty double-pointed needle and stick it under a stitch on that open edge, wrap the yarn around the tip of the needle pretty much like you would if knitting, and pull it though. Your goal is to get a loop on a DPN just like it was a normal old stitch:

By the way it is really challenging to take pictures of yourself knitting. I am just saying.

Do this until you have five loops on your needle:

YOU DID IT!!!!! Pat yourself on the back! Place a marker on your thumb stitches to designate that you, rockstar thumb knitter, are beginning to knit in rounds for the big thumb finale. I always place my marker between two stitches so it doesn't fall off:

Step five: Knit in the round
Now remember, on this very first round as you make your thumb, you will need to:
1) Tighten up your very first stitch (where you added the yarn at the start of this novel.) Just check it out so nothing weird is going on there, and ..
2) On the stitches we picked up don't forget to knit two together (twice!) so you decrease those five stitches down to three stitches. It keeps your stitch count right but prevents any icky holes.
Knit until your thumb measures the desired length. I definitely think it's a good idea to switch to smaller size double-pointed needles when decreasing at the tips of both the mitten body and the thumb, just like the pattern says. I switched to size 9 double-pointed needles on my decrease rows and my decreases are nice and round and pretty. Switching to a smaller needle makes your stitches smaller and more compact and the tips of the thumb and mitten taper real nice.
Step six: Wear mittens in middle of summer, making people think you are crazy. Dream of frosty, cold places to go on vacation and wear your fabulous hand-knit mittens.
crazyauntpurl.com


![[Ñ Ð¸Ñ ÐµÐ»Ñ Ðµ+2.jpg]](https://blogger.googleusercontent.com/img/b/R29vZ2xl/AVvXsEi7vRB_ztuOy_u7fACkWsNwF5b1fgdgkw7ixfsDT_Ia65adyciPGzwJpojuVCYkegAY4TwtXMapjSME6w3l6pmpeEzIxWMiZWEflCIj7I3HFVRMgtxVSP4789kCtTK4bSvKW8oG9oznAEQ/s1600/%C3%91%C2%80%C3%90%C2%B8%C3%91%C2%88%C3%90%C2%B5%C3%90%C2%BB%C3%91%C2%8C%C3%90%C2%B5+2.jpg)


![[Ð²Ñ Ð·Ð°Ð½Ð¸Ðµ+7.jpg]](https://blogger.googleusercontent.com/img/b/R29vZ2xl/AVvXsEiOcIl5bb0Y9XJ4dMl_meUADftkIB9rmTwO1QK1tUUoXqZTXo6OhZKvBDHOQWc6AUvfX6dKiOI1CxaXvditGLFPX-6uwcf6ZU1-ezdu-WpwcRkVSAQilUt6qVyAbpH6RaiW6semCLEQRWs/s1600/%C3%90%C2%B2%C3%91%C2%8F%C3%90%C2%B7%C3%90%C2%B0%C3%90%C2%BD%C3%90%C2%B8%C3%90%C2%B5+7.jpg)
![[Ð²Ñ Ð·Ð°Ð½Ð¸Ðµ+6.jpg]](https://blogger.googleusercontent.com/img/b/R29vZ2xl/AVvXsEgvu_xjvksqKCjf9VuITpQRJ0i7CL8JEaL2eSr0AP4K31Vncsvp6OEuSgVti2iweSQNs4zxPfkvVfoSVXCrODo8QZ6Lt3HgoDVGSI9nOC0KTNv4EmGGUKogrB1FDj_jQhfrljtgD_cN05Q/s1600/%C3%90%C2%B2%C3%91%C2%8F%C3%90%C2%B7%C3%90%C2%B0%C3%90%C2%BD%C3%90%C2%B8%C3%90%C2%B5+6.jpg)
![[Ð²Ñ Ð·Ð°Ð½Ð¸Ðµ+4.jpg]](https://blogger.googleusercontent.com/img/b/R29vZ2xl/AVvXsEgaJo7a-tMpYLu0m_bHl50iBkEWzt5n8fBZrRpQoUwCaH8WB3wlLXl6Ym07TFrcbHFSNsuHTEAWnQnu_M_yyfxzj1h_56xlvm6YSH7ek5KhcNuDO0kZ5xs9hPniBRdpMJ_sGc9veMRPN8s/s1600/%C3%90%C2%B2%C3%91%C2%8F%C3%90%C2%B7%C3%90%C2%B0%C3%90%C2%BD%C3%90%C2%B8%C3%90%C2%B5+4.jpg)
![[Ð²Ñ Ð·Ð°Ð½Ð¸Ðµ+2.jpg]](https://blogger.googleusercontent.com/img/b/R29vZ2xl/AVvXsEjeIF4xYtGfV_t3tjIr_eJr4zqI6kpp4d-piD_sGNXhCq0y2ppJM89iZvd-VUSsSjcVPrzMjj04wyq7csi_-b0-ew324rEjl2FPyRMhRZXo2f4MbQmSZ696WBF0dUo9YEpA1_c4H7KRPJ8/s1600/%C3%90%C2%B2%C3%91%C2%8F%C3%90%C2%B7%C3%90%C2%B0%C3%90%C2%BD%C3%90%C2%B8%C3%90%C2%B5+2.jpg)
![[Ð²Ñ Ð·Ð°Ð½Ð¸Ðµ+1.jpg]](https://blogger.googleusercontent.com/img/b/R29vZ2xl/AVvXsEjIVnf44AlW5eGTo0SIU5xBWa1j6S6Fn_cY27omRtykxrz1Wzn4KCULW2OtWsHuGHEalbKTGyd2eEwDWfI1EEU2vwa_GTAWslPBTWWNlWCd4R805DBnSkexFU1zNyOqyUKYkHdTS-e7K-4/s1600/%C3%90%C2%B2%C3%91%C2%8F%C3%90%C2%B7%C3%90%C2%B0%C3%90%C2%BD%C3%90%C2%B8%C3%90%C2%B5+1.jpg)
![[Ð²Ñ Ð·Ð°Ð½Ð¸Ðµ+5.jpg]](https://blogger.googleusercontent.com/img/b/R29vZ2xl/AVvXsEjs8jIpKdhvgqHJh6exm8YGAUY9hDbrTQNBpdj3V_iud1q2EsaUF36aR5zuhlMhUMUMfbAEdV_cG1c26Bhnl6dS55yyPjqf2rLRMyZGq2tJO1ZqDzb7Ykwi-vw3AZAD1uF1CUctn0617pU/s1600/%C3%90%C2%B2%C3%91%C2%8F%C3%90%C2%B7%C3%90%C2%B0%C3%90%C2%BD%C3%90%C2%B8%C3%90%C2%B5+5.jpg)
![[Ð²Ñ Ð·Ð°Ð½Ð¸Ðµ+4.jpg]](https://blogger.googleusercontent.com/img/b/R29vZ2xl/AVvXsEjjlSiX1l1YFFHLSSZawRzc8CkxL-95JK-XPdh_vgN_Yox5YNGJi2A6GhydfMR1R4GmPeAwKUNcVCxLFJM2CPZBZTFUmM8fAVVMJ02FPBl3upIxRIvcCmBV1ClnCvZZfuXAxpHGmU3MYik/s1600/%C3%90%C2%B2%C3%91%C2%8F%C3%90%C2%B7%C3%90%C2%B0%C3%90%C2%BD%C3%90%C2%B8%C3%90%C2%B5+4.jpg)
![[Ð²Ñ Ð·Ð°Ð½Ð¸Ðµ+2.jpg]](https://blogger.googleusercontent.com/img/b/R29vZ2xl/AVvXsEiOlU9_PfTxa4CI9hauukXcM13lPpl7pEAUBSLC0oV7528HZWhCrFTQsXFRKLQY9dpErf3Zeb9I0g_9tKbvxsQdYkQ1vvs-N7unbhB-Qz4qqe2v44QIanx8wurY63d97uEVh-zxh_RTokk/s1600/%C3%90%C2%B2%C3%91%C2%8F%C3%90%C2%B7%C3%90%C2%B0%C3%90%C2%BD%C3%90%C2%B8%C3%90%C2%B5+2.jpg)
![[Ð²Ñ Ð·Ð°Ð½Ð¸Ðµ+1.jpg]](https://blogger.googleusercontent.com/img/b/R29vZ2xl/AVvXsEgB0dpeCY7Opy1eL-6pPHpcMrihLu3DrhEUTnkQj0P_o2CaKZY_W-ANCOK0RWHrFHcpIAp6ZRY8t7y8ZD7O8yMY4dCpBdfzDW0dnOCYG7eFSvAgBtLAjy6kGxBYGvYEtPEuSMlfTBHkDGY/s1600/%C3%90%C2%B2%C3%91%C2%8F%C3%90%C2%B7%C3%90%C2%B0%C3%90%C2%BD%C3%90%C2%B8%C3%90%C2%B5+1.jpg)
![[Ñ Ð¸Ñ ÐµÐ»Ñ Ðµ+4.jpg]](https://blogger.googleusercontent.com/img/b/R29vZ2xl/AVvXsEh7kwlWqjFCIzRRIP5g_NZc3LlbzjzIPCgjg_j8m4DYbk9TkAkloZaZvjtZEckqVdWeQ8gLwBYTAMH8iMpNDWNRU9KZINlOmB-AiJNyM-hpgFc4OdSCRKdLgZITzP6ilWZ3eSxzDmylVAs/s1600/%C3%91%C2%80%C3%90%C2%B8%C3%91%C2%88%C3%90%C2%B5%C3%90%C2%BB%C3%91%C2%8C%C3%90%C2%B5+4.jpg)


http://www.liveinternet.ru